Friday, December 27, 2013

Torchiere lamp fit

Torchiere lamp projects its light mainly upward toward ceiling and then reflects down. Using LED or CFL bulbs is not as effective nor as bright as using our LED base lamp. This conversion had brighten many rooms and many users are very happy with the result.

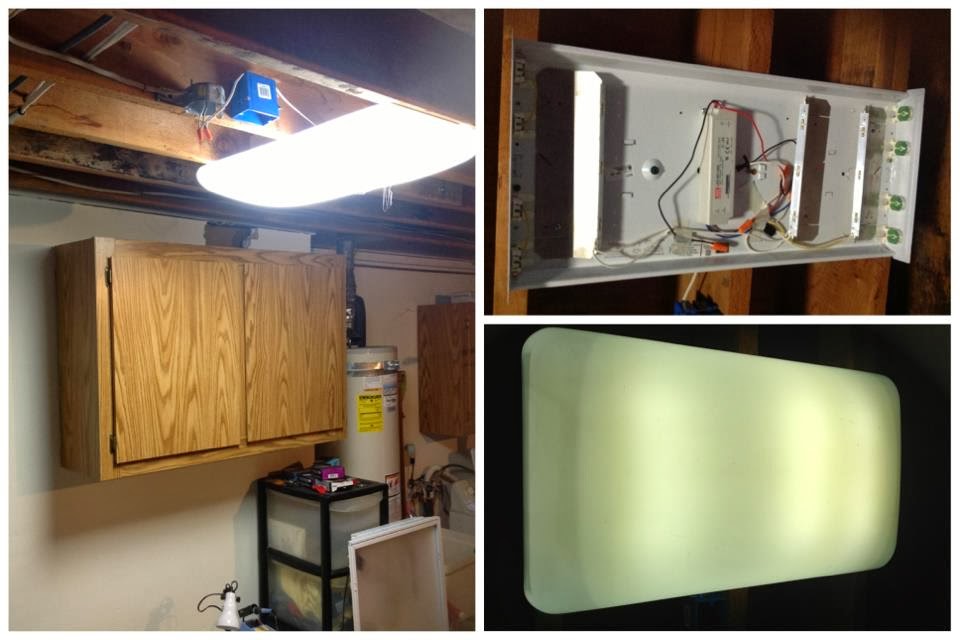
This conversion use a LED base lamp, it is configured with two easy LED modules stick on both sides of driver, This is a 32 watt LED base lamp with diffusers. One of good application for this base lamp is to be a LED replacement luminaries for torchiere lamp; It's very bright yet only use 32 watts. Not just energy, I did this also because the CFL bulbs used in lamp were making too much noise for reading.
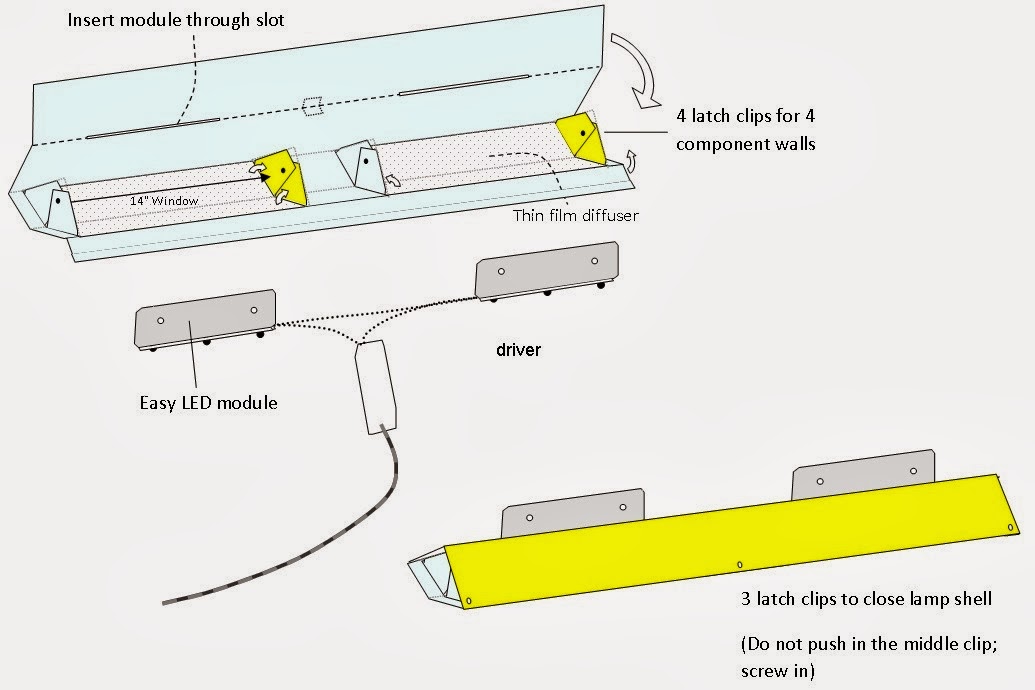
The kit comes as 2 diffusers, pre-wired 2 bent LED module and one driver.

(1) first install diffusers on to the modules.
(2) peel off the double sided tape and fasten LED modules to two sides of driver, with light output point outward.
 

This is our LED light Gut, about 9" long, 4" tall and 5.5" wide, weight just 1.0 lb


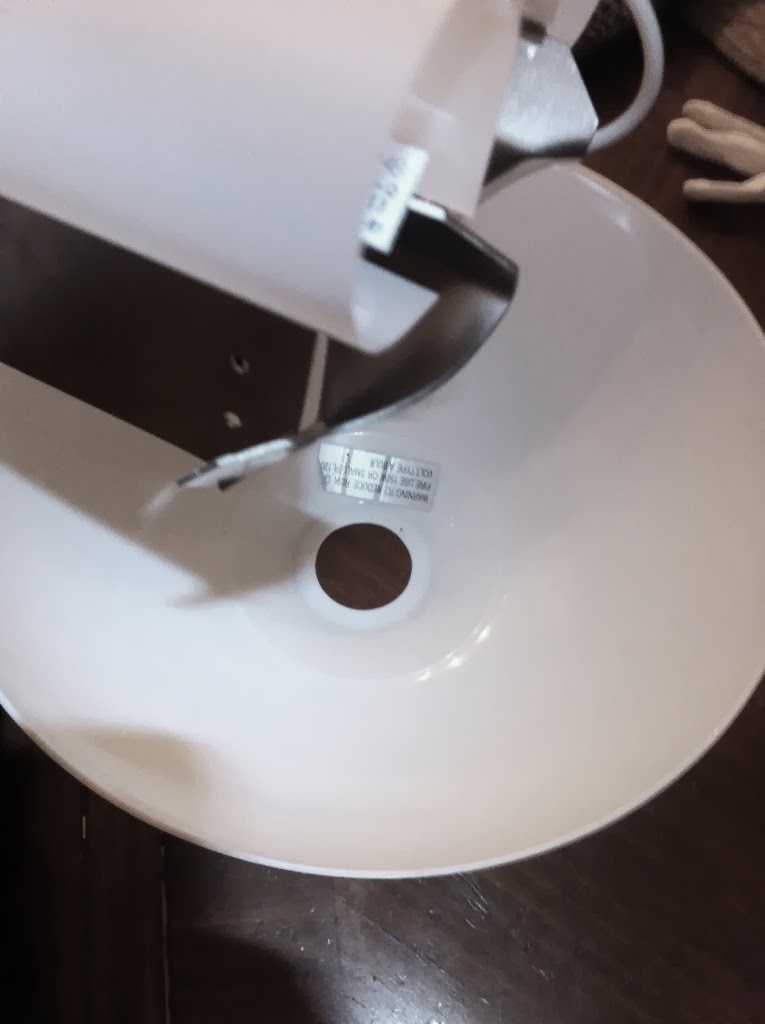
(3) Work on the torchiere Lamp, clean existing light gut that is either using light bulb or Halogen; only leave AC power wires
The metal plate can be bent using a pair of pliers for fitting in the bowl.


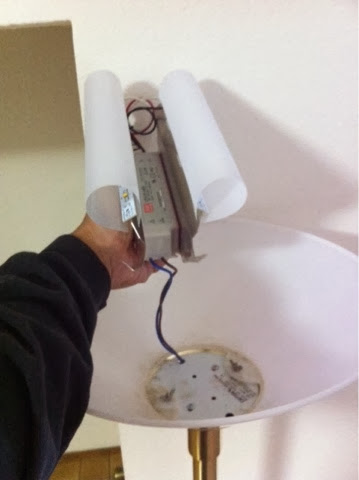
Adjust module inside Lamp shell so it can point light to where we need it most. See how bright it make a room.

To get Easy LED base Lamp


Friday, December 20, 2013

World Lamp assembly instruction

World lamp is Shop light from Easy LED Lighting


The parts needed to assembly one World Lamp:
Light gut set has two LED module, driver and wire set,
One piece Lamp shell,
Snap lock pack (7 locks).


Fold tabs near diffuser window up right and align to holes, use snap lock to tighten tabs together to form chamber walls. When folding the tabs, use hand or a ruler to press against the folding line.

Snap lock is a set of plastic push in screw and nut, they can be push in; but to really tighten parts, still turn screw to tight.  
Insert LED modules through two slots at top of lamp shell, 

Insert electrical wire plug through top open at lamp shell, place LED driver at middle chamber,
close the opening door, tape them together if possible. 
Turn chamber walls up right. Fold down the latch tabs on inner lid to hold walls in position,
After hold all 4 walls at position, close lamp lid.
Use snap lock to fasten lamp lid, use the complete set to lock holes at both side, use only the screw for middle hole, where the nut is glued to inner lid.
Lamp can be hang via screw hole on both LED module, or can be nailed or screwed to wood frame vie those screw holes.

Friday, December 13, 2013

Fluorescent lamp Conversion/Replacement


Some Fluorescent lamps have fluorescent tube(s) inside to emit light and diffuser cover. They can be a perfect housing for LED replacement, using our kit with LED modules and driver.
All you need is their housing and diffuser cover, all those tubes, ballast can be removed to make room for installation. Following photos are examples of lamps and their installation.
All you need to do is to make sure to position LED at least 3"+ away from diffuser and arrange them disturbed evenly around the lamp, fix modules and driver inside the lamp housing, and connect AC wires.  The lamp are now LED lamp instead of Fluorescent lamp. Bright, long life time, energy saving and humming noise free.


To get Easy LED kit

Monday, December 9, 2013

Terrarium application

A customer use our light for his terrarium for rain forest frog. His site is FrogCube.


This customer use our easy LED light to replace his old LED tube. You can see the comparision at below pictures. On the left is our 45 watts Easy LED kit installed; on the right is a LED light tube. You can compare the brightness and color temperature.


Another photo with terrarium tank installed. Still compare to a LED tube on the right.
I do have concern about the 45Watt kit being too bright for this application, typical household fish tank or terrarium tank at 4' depth or less could use less driving power to match with household light, that's why we recommend 700mA driver for general household use at 4' distance; but this customer wants his tank to be very bright  and he shots photo and video at his setup. Our kit just works very well at natural white, closest to day light.  You can see his post at forum. I will add more photos at our blog as this customer update his site.
Nothing concludes better than this customer's own blog

"My final conclusion is these are great buy for anyone looking for an easy low profile solution for lighting rack of tanks, or one long tank. Not only are they bright and sure to keep all your plants healthy, they are also a nice 5000K white perfect for viewing your terrariums are taking photos of the tenants inside. And if you look at my light readings for the bottom of my tank, you’ll see there is plenty of light to record their activities."

Monday, December 2, 2013

Aquarium Light


We are also in process to develop Easy LED Aquarium Light set.
Our kit comes with a lower power level LED driver, and one to three Easy LED modules. The reason we use lower power driver is that typical fish tank has depth about 3 feet; unlike typical room application is shining down from 8 feet ceiling. Also lower power mean energy saving, this is especially important if you turn on the aquarium light 24 hrs a day. 
The mounting is easy.  just fit our module at top edge of cover with double sided tape; or place an overhang truss (eg. 1x2 wood) over fish tank and replace our module at top edge as below photos shown. Diffuser installation link.


Use 700mA (vs 1400mA) driver to deliver a softer light output than typically room lighting at 8' height or higher.

700mA also mean use less energy.


Saturday, November 30, 2013

How to trouble shoot a LED kit? (and Quick fix)

Every kit we shipped had gone though a 10 hours burn in test, however the kit may still got damaged during shipping or by installer.  And these LED chips can be damaged by ESD (Electrical Static Discharge) before they are installed and grounded. ESD can be introduced as easy as one finger touch and a lot depends on what the installer wear (like sweater and shoes). The movement of human body and cloth can generate static charge and it may build up, and we would like to release that charge before we touch LED module. One common practice is to release charge from installer prior to touch sensitive electronic parts. Such as touch grounded environment object with bare hand or body part.

But damage may have been already done, So we need your help to determine where had gone wrong.
First, you should describe what model is your kit and what's the problem. Tell us how many LED modules are linked together. Then we need you to identify the model number of your LED driver, like shown in below picture, the model number is LPC-60-1400.

Then with the wires correct connected and tucked away, we want to do a live test with power turn on.
Our test should avoid any AC part and only perform on our LED module. If you have a voltage meter like multimeter, use it to measure driver output, read the voltage (LPC-60-1400 should output 42V)
But most of us don't have a meter, we can test it one by one by using a metal tool to short the two solder points of the LED module. Be aware, when you short circuit one module, the rest of modules may come up in full brightness, so be prepared for that. When a bad module is short circuits, all good modules will come up in full brightness. A quick fix is to connect the two wires of the bad board and rest of modules will continue to work. That's if you know how to do wire splicing. 


Fig: use a metal tool to short circuit a module

These points only has DC power supply to, it's safe to touch with hand..

Thursday, November 28, 2013

Kits safety

Below picture shows our driver and module work under water, Of course, that's not recommended. Our LED driver is rated IP67, which means it can work under water less than 1 meter deep.
The output of LED driver output is less than 24V DC, which is not hazard. The real dangerous part is the AC wires, just need to protect the AC wire and plug from water.
To place our lamp at damp places, there shouldn't be any problem.
Image-330486-full

LED kit burn-in process

Have you seen new installed LED street light just went dark after a few day? Have you seen LED traffic light got broken just after a short period of time? Isn't LED lighting suppose to long life? Why do we see so many failure LED around us?
After our study, we find out this is a popular problem among high power LED; less with lower power LED. One of common reason is bonding wire broken.
What's bonding wire? It's a thin wire that connects silicon die and Chip package connector. With high power LED, its chip die can go up and down in a wide temperature range; and due to material can contract and expend at different temperatures, this bonding wire may broke if the die, bonding proxy and connection pad are in an odd arranged position.
Does LED manufacture test their product? Yes, they do, to an extend. their expensive tester machine can make contact to chip connectors without making a solder point. However, they won't occupy expensive tester machine with low price (few dollars) chip for a prolonged time.
So this has to come down to us.
Modules from Easy LED Lighting are basically tested by China manufacture, so they do work. But after we were into this business a while, we found out there are a low percentage of modules would fail after just a few days of usage; otherwise, they would work for a long long time.

Right now, we burn in test our kits products, every kit will gone through a 10 hours burn-in process with on/off sessions control by timer, just to ensure their quality.